Category Archives: Ringing thoughts

Discussion of change ringing on church bells

Plain Bob Minor on Handbells

Ringing a Plain Course of Plain Bob Minor on handbells

In this clip, the band rings 60 changes of the method Plain Bob Minor.  The ringers have not learned the changes – they are generating each change from the previous one using an algorithm named Plain Bob.  The term ‘minor’ means they are ringing on six bells. If they were ringing on eight bells, the term would be ‘Major’.

There is an almost infinite variety of algorithms, which ringers call ‘Methods’, some of which are immensely complex. One requirement of change-ringing is that during a ‘touch’ (i.e. short period of ringing) all the changes must be different and must never repeat.  Moreover, no bell can change position in the sequence by more than one place each time it rings.  This presents further challenges in the design of ‘methods’.  It is possible ring six bells in 720 different orders, which is called an ‘extent’.  There are 60 changes in the ‘Plain Course’, so to extend it to 720 changes, variations called Bobs and Singles have to be put in by the conductor, who must be one of the ringers.

A clock regulator

St Andrews’, Cobham, Surrey

I’ve not blogged about one important clock that I look after – namely the church tower clock at Cobham, Surrey.  The clock is a so-called ‘flat-bed’  made by Thwaites and Reed of London in 1896.  It uses the tower bells for a ‘ting-tang’ strike on the quarters and it strikes the hour on the tenor (heaviest) bell. The mechanism is shown at the top of this post.  It rests on steel I-beams at the level of the clock dial in the photo of the tower.

It used to be wound by the bell-ringers once every week, which meant ascending two vertical ladders, one an ancient timber ladder fixed to the wall, through a trap-door and up another a steel-rung free-standing ladder and trap door;  then winding three heavy weights up through the whole height of the tower, a job requiring dedication and effort.

The rear of the clock, showing the winding motors
The rear of the clock, showing the winding motors.

Probably around 1975, when the bells were augmented from six to eight, electric winding was added. No doubt, some of the ringers were starting to feel their age! One motor raises a weight a short distance to keep the pendulum going even during a power failure; two other motors drive the quarter and hour striking chains directly.  There is an electronic control box for the striking mechanisms, although I’m not sure what it does. It doesn’t control the number of strikes as this still uses the original mechanical system linked to the position of the clock hands. I suspect that it silences the chimes at night, although I’ve not been there to find out.

Some of the eight tower bells

However, more than a year ago, just after I became a ringer at Cobham, the clock kept stopping. The clock makers took ages to attend and restart the clock.  After a month or so, it stopped again.  This happened several times, and the church authorities were getting complaints that the clock was never right.

At first the clockmakers tried to blame various things such as a fault in the church electrical supply, but I pointed out that the clock always stopped at 53 minutes past the hour, although not always the same hour, and that there didn’t appear to be a fault in the drive to the clock hands.

The pendulum and catcher plate

The clockmaker explained the operation of the regulator mechanism fitted to the pendulum. The pendulum is about 7 feet (2.1 metres) long, so it is probably designed to have a period of 3 seconds. The idea is that the pendulum is set to gain very slightly and the position of the hour hand is checked by a tag that should pass a light sensor at 53 minutes past the hour. If the clock is fast, the regulator has a magnetic arm that extends to hold the pendulum stationary for a few seconds and then releases it so that the clock is correct when the hour is struck.

Identifying the problem

After much persuasion, the clockmakers replaced the whole regulator system, but this did not cure the problem.  Then I noticed that the catcher plate on the pendulum had twisted slightly so that it was no longer directly aligned with the magnetic arm.  The catcher plate is held onto the very heavy cast-iron pendulum bob with plastic cable ties. Since we’d been having unusually hot weather, it is likely that the cable ties were able to stretch slightly, allowing the catcher plate to loosen and slip a tiny amount round the bob. The more off-centre it became, the greater the tendency to slip until the catcher, instead of stopping the pendulum, merely  impeded it until the swing was insufficient to maintain the drive.

I discovered that by carefully using a heavy spanner to tap on the catcher plate support, I was able to re-align it exactly and the clock is now keeping time perfectly!  I will probably now glue the catcher plate into place with heavy-duty construction adhesive.

The tower bells

I should briefly mention the bells themselves.  There are eight bells: two date from the mid 18th century, with the most recent being cast in 1979 when the ring of six was augmented to a ring of eight. The heaviest bell (the Tenor) was cast in 1902.  It has a diameter at the mouth of 38 inches (97 cm), weighs half a ton and is tuned to the note of G.  There is much more about the bells and ringing on our sister website.

The bells are hung for ‘full circle’ change ringing in a steel and cast iron frame mounted above the clock and they are rung from the ground floor, so they have what is called a ‘long draught’ of about 60 feet.

In the photo above, they are in the ‘down’ position and you can see the blue-painted clapper hanging free in the centre of the bell. There are separate clock hammers which aren’t shown in the photograph.

A model bell up at handstroke

In this photo of a model bell, the bell is raised or ‘up’ for change-ringing.

The bells are raised and lowered by using the rope to swing them higher and higher.  Ringers try to do this whilst ringing the bells in order, a skill that is particularly difficult to acquire.

The clock can only strike the bells when in the down position, so they must be lowered from the ‘up’ position after each ringing session so that the clock can strike.  This also requires considerable skill and if a tower doesn’t have a clock, there is quite a temptation to leave the bells ‘up’, but this is generally frowned upon as it would then be very dangerous for anyone go amongst the bells.


A customised peal book

Peal Records

Peals are important records of the progress made by ringers and reminders of important events. However, I have never kept my own record of the peals or quarter peals that I have rung – partly because I have not yet reached 100 peals, so this wasn’t impressive or significant, and partly because once you have forgotten to record something, the records are meaningless.  However, some people are dedicated record-keepers and there is at least one complete database of all peals that have been published in the Ringing World or on BellBoard, so now it is possible to produce a personalised list of peals.

I’ve just rung my first peal as conductor, so I thought it was time to repair the situation and I got a download of my peals from PealBase.  I found it nostalgic, revealing and somewhat scary, showing as it has that my ringing has not improved over the years.  But I wanted to find a nice way of keeping a printed copy.  Ring binders are not very satisfying because the pages wobble about and can look untidy and unwieldy; a comb-bound copy isn’t very easy to add to;  a ‘perfect-bound’ (glued spine) copy is lovely but once made it can’t be altered.

Spring-backed binder

So I decided on a spring-backed binder.  These are easy to add to and nice to read.  They’re not quite as neat as perfect-binding because a wide margin is needed for the spine to grip, but quite nice to read when sitting in an armchair.

I found that these are being sold for family history researchers and can have custom titles.  But those that I saw either had ‘Family History’ embossed or were very expensive to customise.  But you can also buy plain ones from high-street retailers like Rymans.

Decals

I wanted my own title and thought I could use lettering transfers, but I couldn’t find anything that I liked.  Then I came across some small sellers offering custom vinyl lettering transfers (which they call ‘decals’, meaning to trace or transfer) at a very reasonable price.  Whoopee! 

Varnish

I suppose I’d first heard of ‘decals’ when making models as a kid, but I assumed it meant something to do with decoration.  Anyway, I ordered some on-line for a very reasonable price and transferred them to the front cover and spine. I was worried that they might lift at the edges and detach themselves so I bought some clear picture varnish spray, mainly because that’s what was sold by the local art shop.  I think this might have been a mistake as it is taking days to dry and it seems that the edges of some of the letters have become very slightly raised, the very thing I wanted to avoid.  I should have bought some protective spray lacquer which is available from hardware shops, but I’d have had to track some down.  More haste, less speed, I guess.

Overall it is rather nice and so I thought I’d share the idea with you.  I will post some photos as soon as I have some ready.


Ringing Mats

One problem facing new ringers is which bell is which?

This is very confusing at first, even in the simplest call changes, and often causes chaos.  By special request, I agreed to make some numbered mats.  In various towers I have seen these, usually woven or crewelled, and usually round.

So I did a search for round mats and couldn’t find anything I liked.  Mainly they are quite thick, often too big, and sometimes didn’t lie flat. Plus, they were all too expensive. Anything that could be a trip hazard is unacceptable.

Then I remembered that I’d bought some ‘dust-absorbing’ rubber-backed door mats that were thin and specifically designed to lie flat.  What’s more they were cheap, which was important as I needed eight of them.  I chose turquoise, which wasn’t perhaps my first choice, but were available for about £6 each.

I wanted to paint a number on each mat, so I decided that I needed a set of stencils.  These turned out to be expensive because I wanted 20 cm (8 inch) high numbers which cost £2.50 each although there was a discount.

So I carefully centred the stencil on the mat, stuck it down with parcel tape and masked around it to prevent overspray.  Then I carefully sprayed with a yellow spray which I though would look nice.

DISASTER! The absorbent carpet lived up to the very word of its name.  The sprayed number was essentially invisible. Never mind – give it another coat.  This disappeared too.  I tried using a primer spray – no better.  By now I’d spent as much on the spray as I had on the stencils.  Looking around my store cupboard, I found some white gloss water-based paint.  What the heck – let’s try that.  Thankfully that stuck to the fibres of the mat instead of going through them onto the backing, but it was slow to dry and required another coat or two.

Numbered mats
Numbered mats

Nevertheless, they look good and are popular, although there is still a bit of yellow overspray on some of them (and even more on my patio).  Pity it never showed up where it was needed.

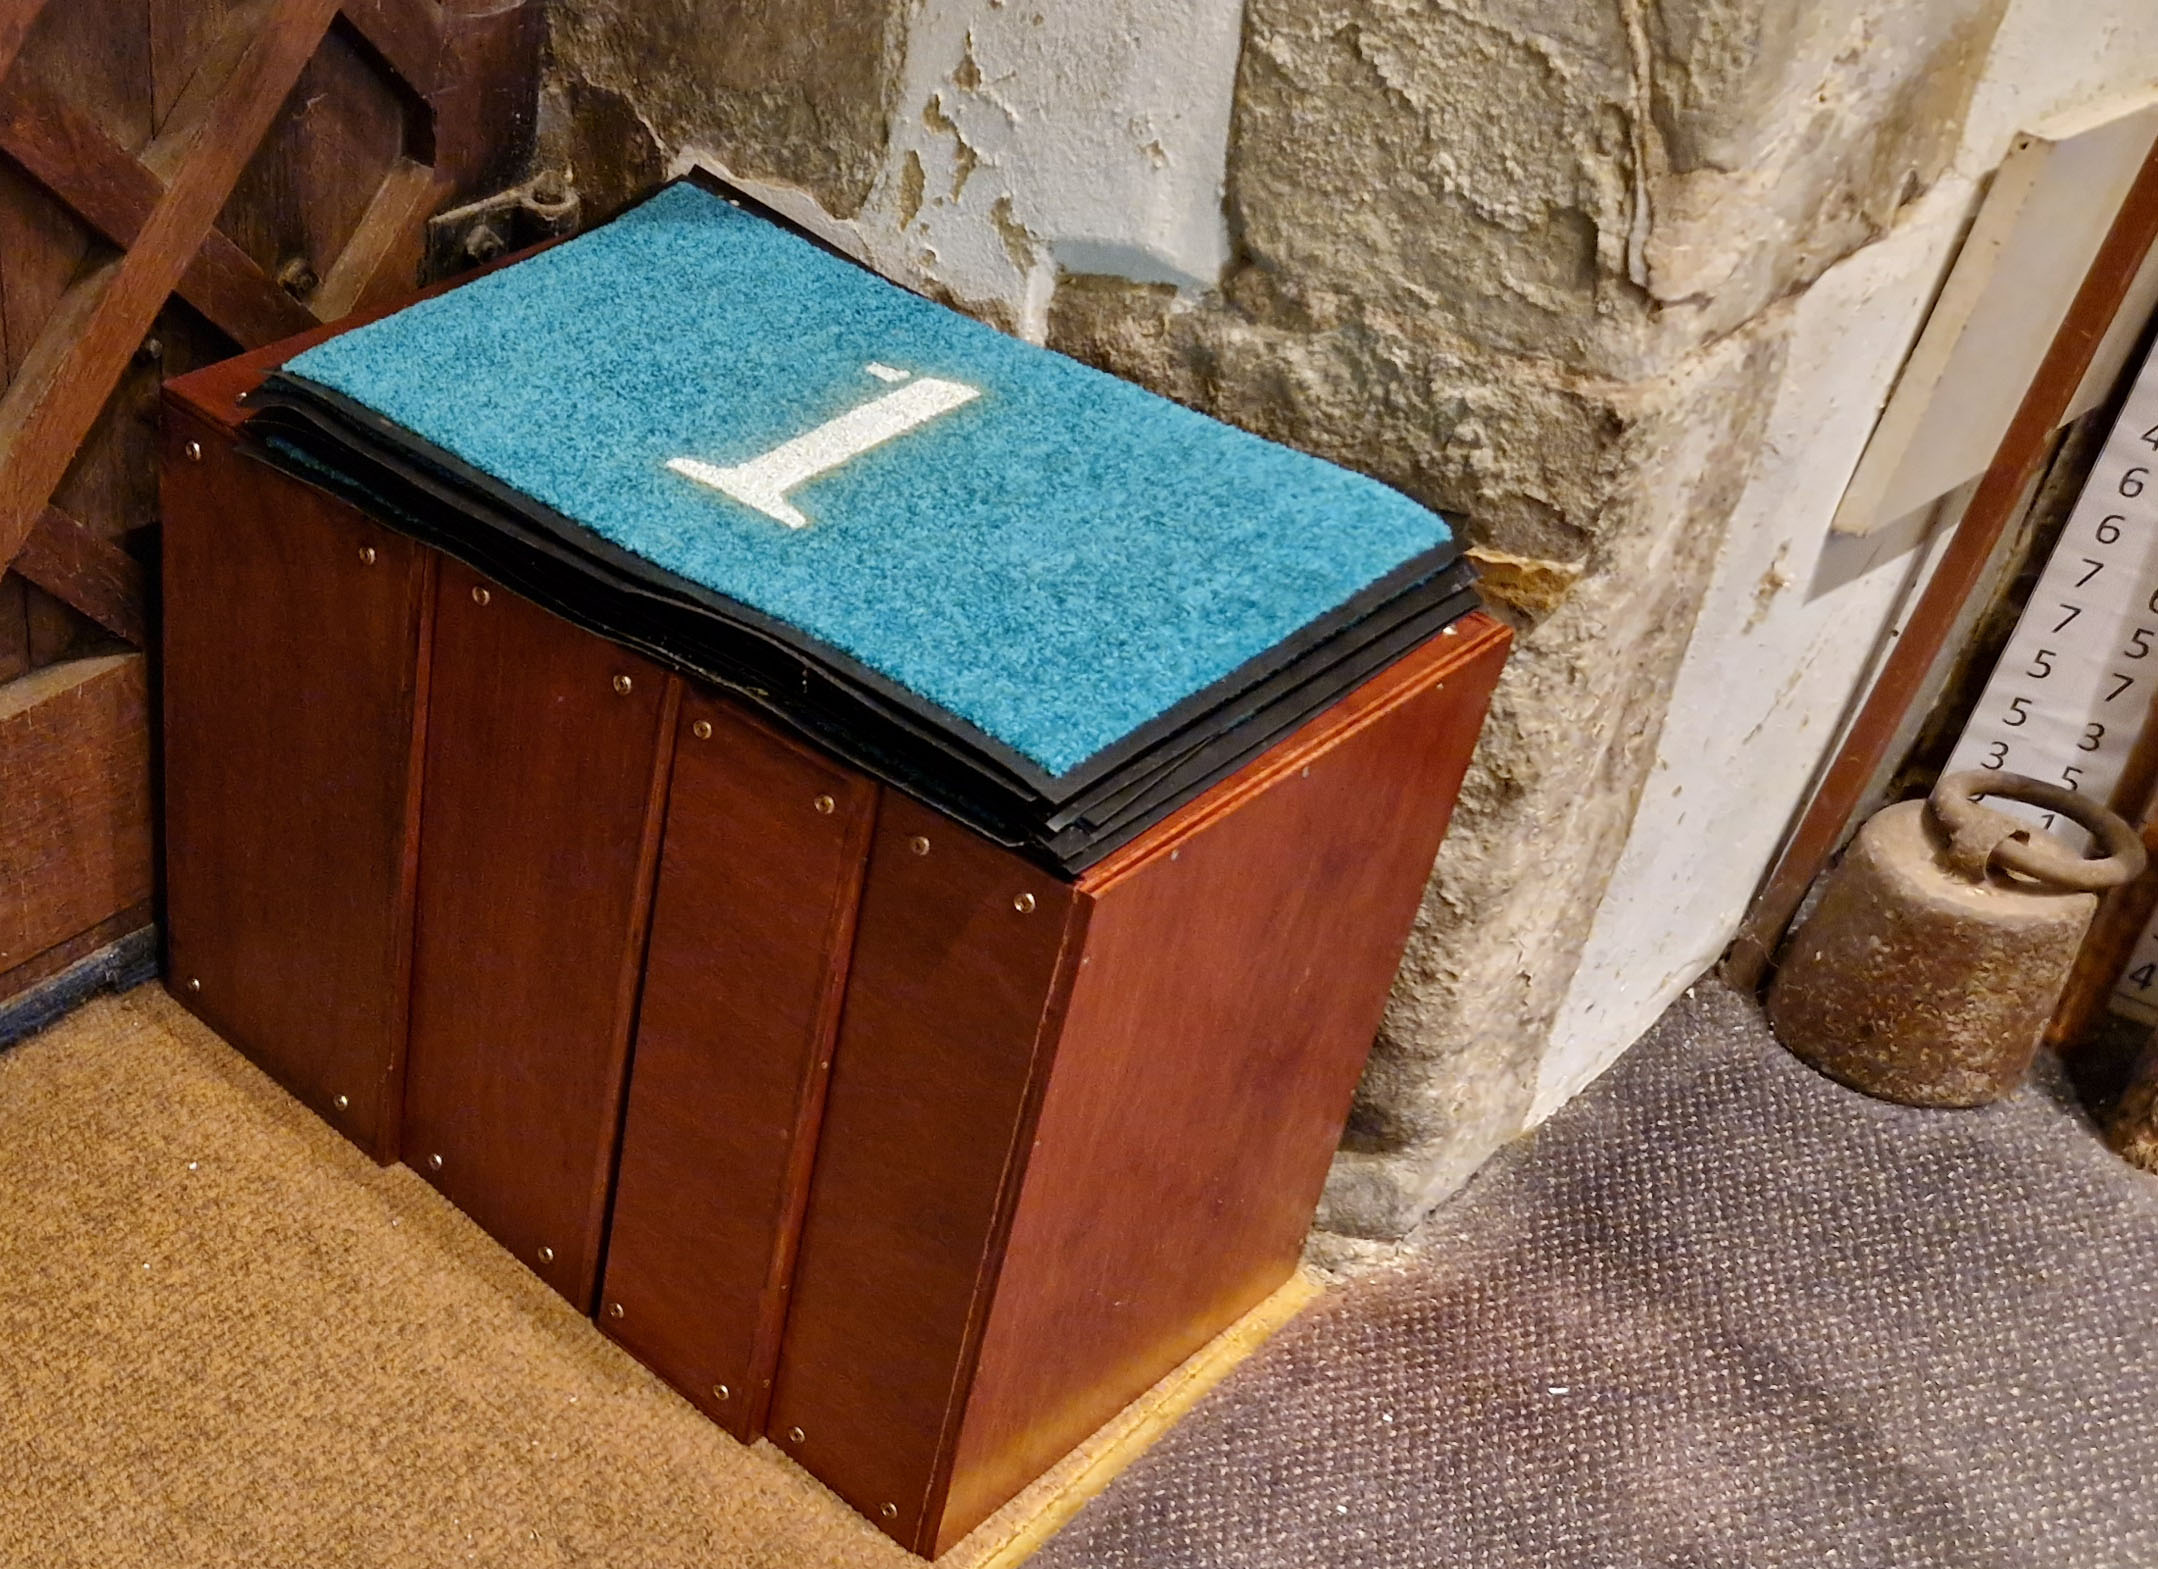
The picture shows them in front of the new boxes I’ve made and described in a separate post.

A Ringers’ Box

The length of the tail end

The length of the rope at backstroke is critical for good ringing.

It can be adjusted by moving the length of the ‘tuck-back’ at the tail, but most ropes are too stiff to do this easily, so you need to use a marlin spike or fid – constant changes can cause a lot of wear and fraying.  So usually, the tail is adjusted to be the right length for the average ringer at the tower.  Then ringers with a long reach can put a knot in the rope, whilst shorter ringers can stand on a box.

The features of a Ringer’s box

At Cobham, the existing boxes seemed to be a random collection of varying heights, cross-section and stability, and really quite heavy. They seem to be made from various off-cuts and don’t look at all tidy. They can’t be stacked on end as these are uneven, so they have to be stacked one on another. It’s difficult to stack them, and equally difficult to extricate the required box from the stack.

A design for a box

I decided to make some new boxes to a design that I’d successfully used at Ashtead about 40 years ago, which are still going strong.  Each box has the same plan dimensions of 51 cm wide by 38 cm deep, but of varying heights. I’ve realised that this probably originated as 20 by 15 inches!

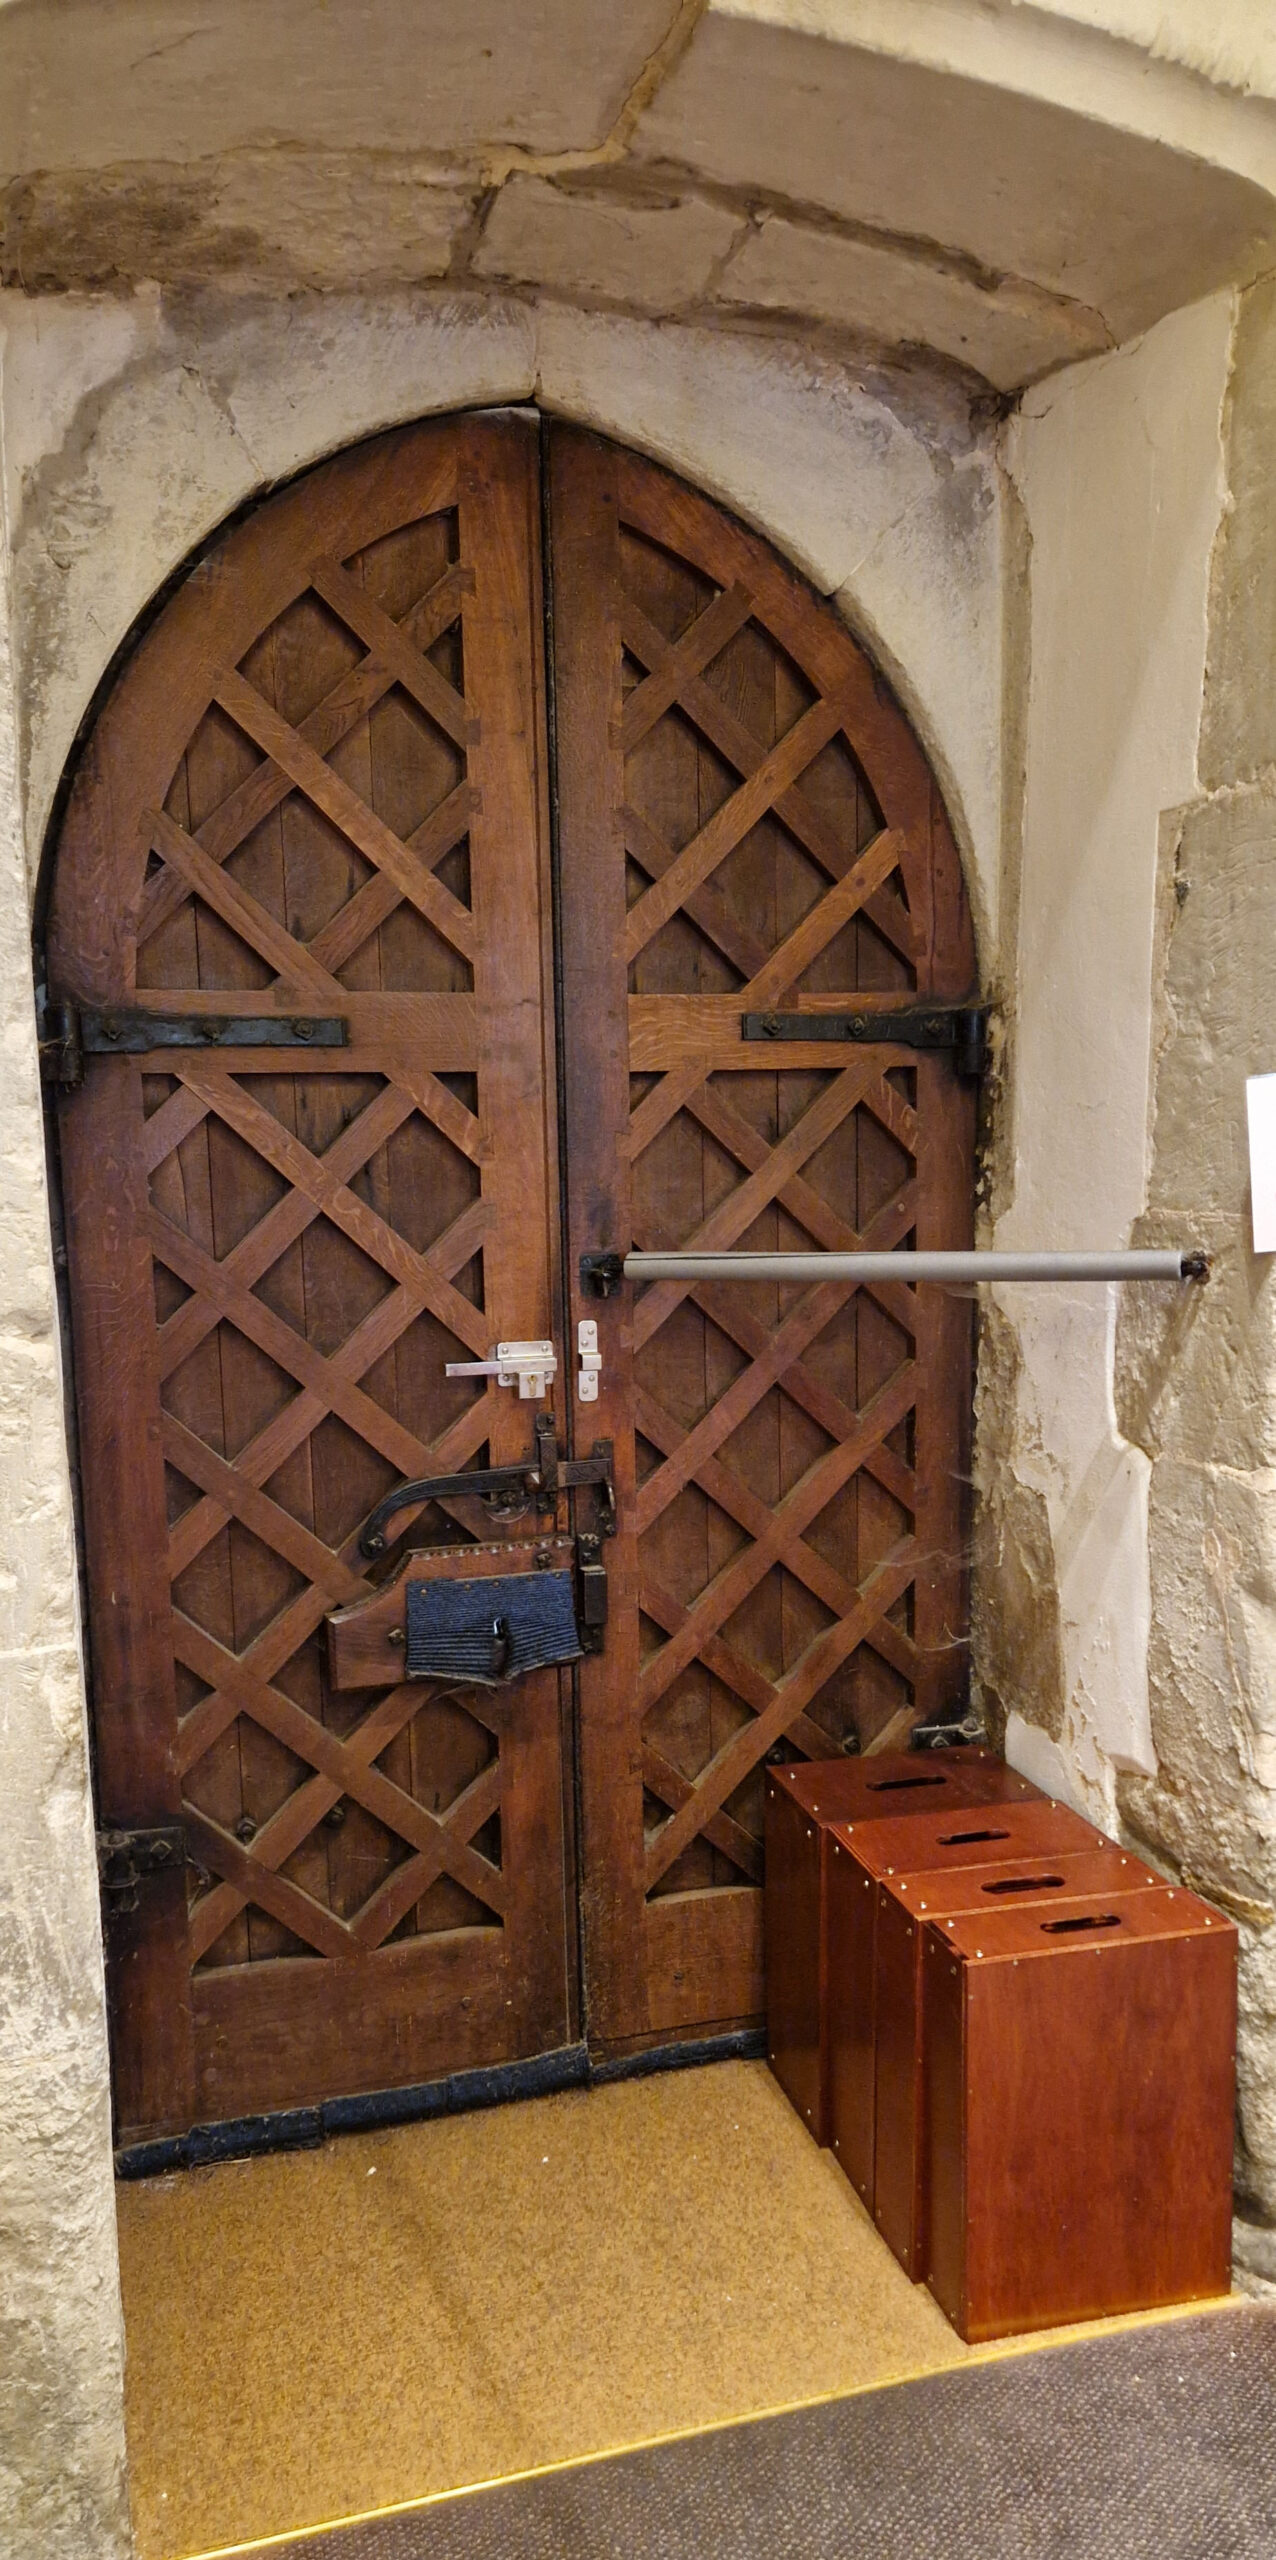
Boxes standing in mediaeval doorway

This is a good size as it allows some shuffle room for the feet, and when stacked on end, a hand-hold allows the desired box to be lifted out and taken where it is wanted. The ends form a level surface on which we can store our mats (the subject of a different post on here).  A further advantage is that they are an ideal height for use as a seat, as we don’t have room for any benches in the ringing room.

Whilst it might look nice if the top overhangs the sides, this is unacceptable in a ringer’s box, as the rope can easily snag on the corner, which is disconcerting and potentially dangerous.  The top must be flush with the sides.  And this also makes the box more stable when stacked on end.

Number mats stacked on top of the boxes

I’ve seen some lovely designs with a carpeted top.  This might help people who are worried about slipping off the box (slipping or falling does worry a lot of learners).  If necessary we can tack a carpet onto the top later.  For myself, I prefer to ring in shoes with a soft, grippy sole anyway – I recall the slippy polished lino of yesteryear!

Material

I’m not much of a woodworker, I don’t have a workshop and I only have basic portable tools, so I need a simple construction.

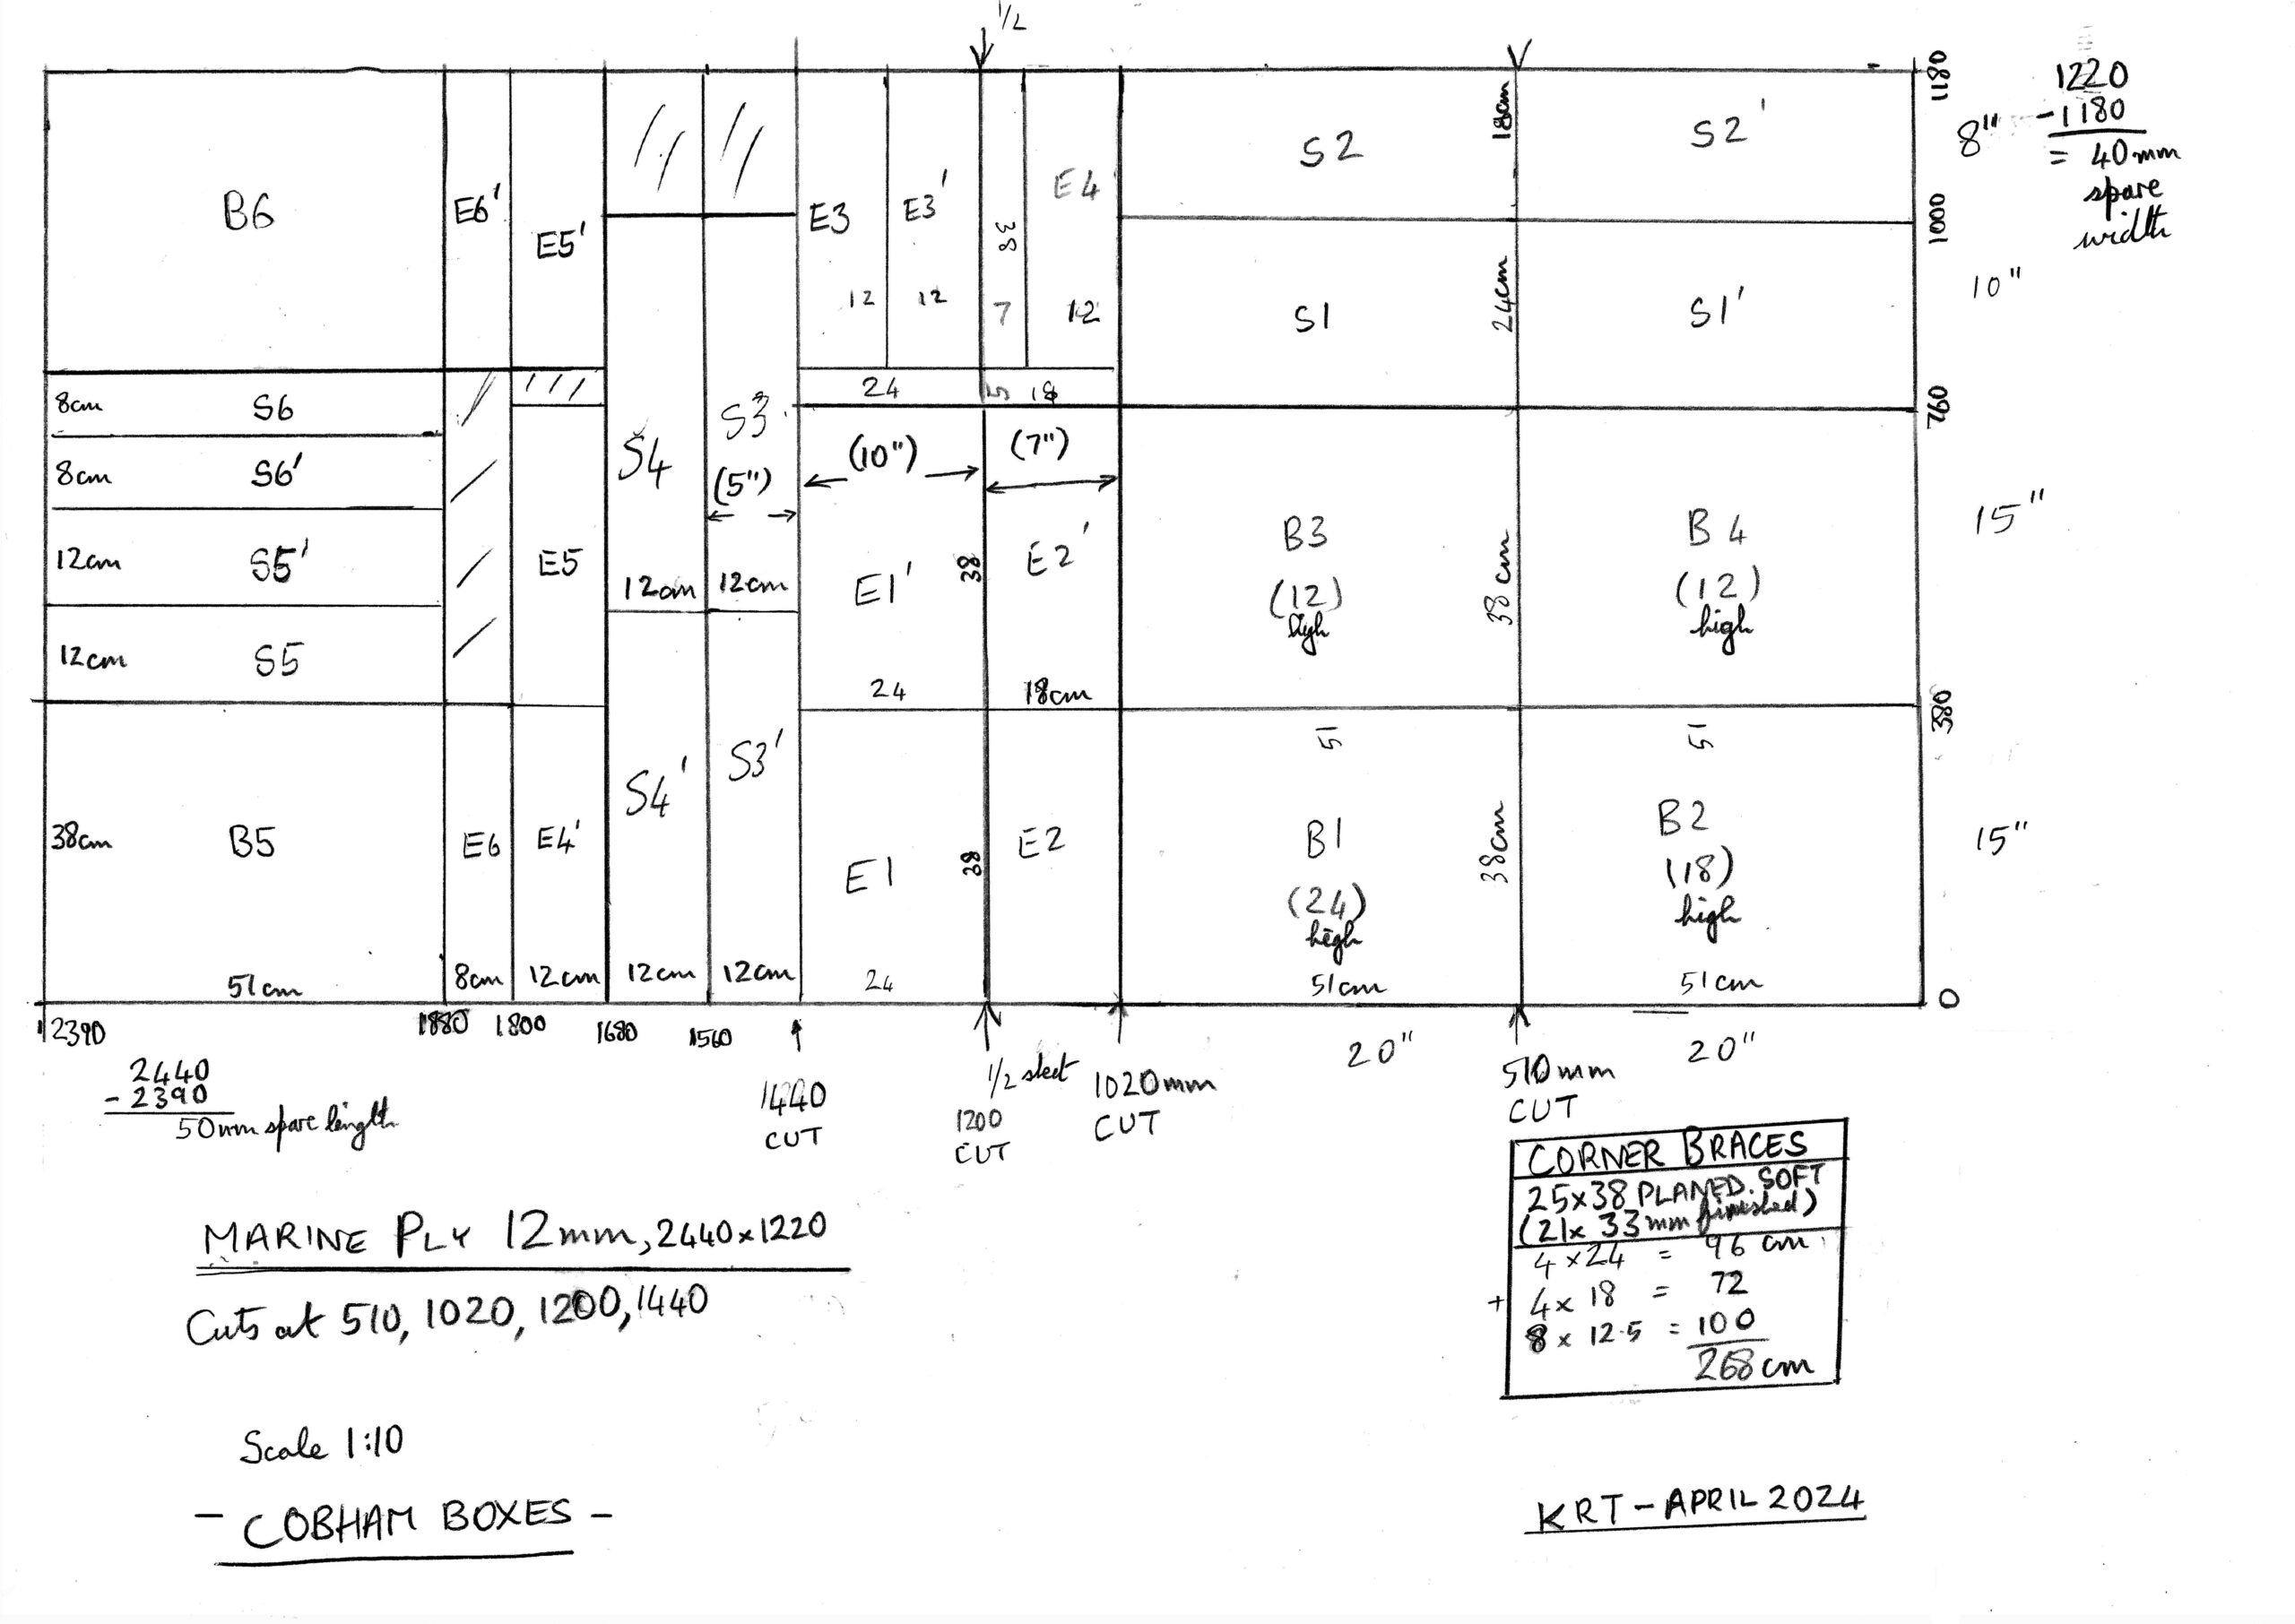
I bought a full sheet of 12 mm marine ply, nominally 8 x 4 ft or 2440 x 1220 mm from my local timber merchant, who offered two free cuts plus a nominal charge for additional cuts.  So the question was how to make the best and most economical use of this quite expensive material. Assuming that my original design must have been optimised for a standard sheet of plywood, I came up with the cutting plan shown below.

This provides six boxes with heights of 24, 18, three of 12.5 cm and one of 8 cm.  This last one is a bit small, but all I could reliably squeeze from the sheet.  It could be laid on top of one of the other boxes to give a bit more height.  Actually, all the boxes are 1.2 cm higher than the above, taking into account the thickness of the top.

Why Marine Ply?

I chose marine ply because I needed a strong material so the boxes can support the weight of perhaps a very beefy ringer.  The tower is quite cold and damp at times and the boxes will stand under the arch of the west tower door, it’s quite possible that the floor could get damp. I’d experienced trouble with warping of ordinary ply, which also sometimes has gaps in the joints of the internal layers of ply.  Marine ply uses waterproof glue and is intended for structural use.

Cutting Plan

Since the timber merchant offered two free cuts, I sent him the following cutting plan, showing the width of the sheets I required.  I could, and should have included other width-wise cuts, but at the time I was unsure and just wanted to get the order in.

Shows where the plywood sheet is to be cut
Plywood Cutting Plan

I also needed to order the softwood batten to act as the corner braces – I got 3 m of 25 x 38 mm planed softwood which works out at 21 x 33 mm finished.  This isn’t enough for all six boxes, which would need another metre, but I had an offcut already available.

A point to make when cutting is that the width of the sawblade is around 2 mm, so each cut loses that much off the width. Also, some material is lost in finishing the surfaces.  There are 8 cuts across the width of the sheet, so at least 16 mm is lost in cuts, plus a further amount for finishing.  I calculated that my dimensions left about 50 mm on the length and 40 mm on the width spare to allow for this wastage.  In any case, it’s not as though everything has to fit tightly together.

A further point is that the end boards need to fit inside the side boards at the corners.  I decided it was easier this way round as, in my cutting plan, the side boards had been cut to exact length by the timber merchant, so the end boards had to be shorter than the top of the box by 24 mm.

Assembly
Inside the boxes
Inside a box showing the corner battens

I cut battens to fit to the height of each corner and glued and screwed these flush to the end boards using ‘Resin W’ PVA glue and 4.0 by 30 mm Torx head screws sitting in steel cups.  I then fixed the side boards likewise and then added the tops, which I fixed with 3.0 by 30 mm screws and glue.  I did try fixing the tops with panel pins, but the marine ply is very hard and some of the nails were driven skew between the plies and I had to take them out again.

Hand-holds
Showing the inside of the box standing on end for use as a seat

I used a hole cutter to make two 30 mm holes 400 mm apart in one end of each box, then used a jug saw to cut out a slot between them, so it would be easy to pick the boxes up from the floor.  I realised that this would be the end that people used as a seat, so I screwed some off-cuts inside the lower part of the end-board to give it a bit more strength.

Finishing

I had used wood stain on the Ashtead boxes, but I never liked the appearance, so instead I used Rustin’s Light Teak Wood Dye with a bit of darker Indian Rosewood mixed in.  This is a methanol-based dye which can be painted on and dries very quickly.

I then used Ronseal Interior Gloss Varnish inside and outside all the boxes.  I needed 3 or 4 coats to get a good finish which is only semi-gloss and not skiddy.   I was particularly careful to ensure that the bottom edges were smooth and well-sealed because I’d noted on the Ashtead boxes that after some years of hard use the surface layer of ply had splintered, caught in the carpet and delaminated.

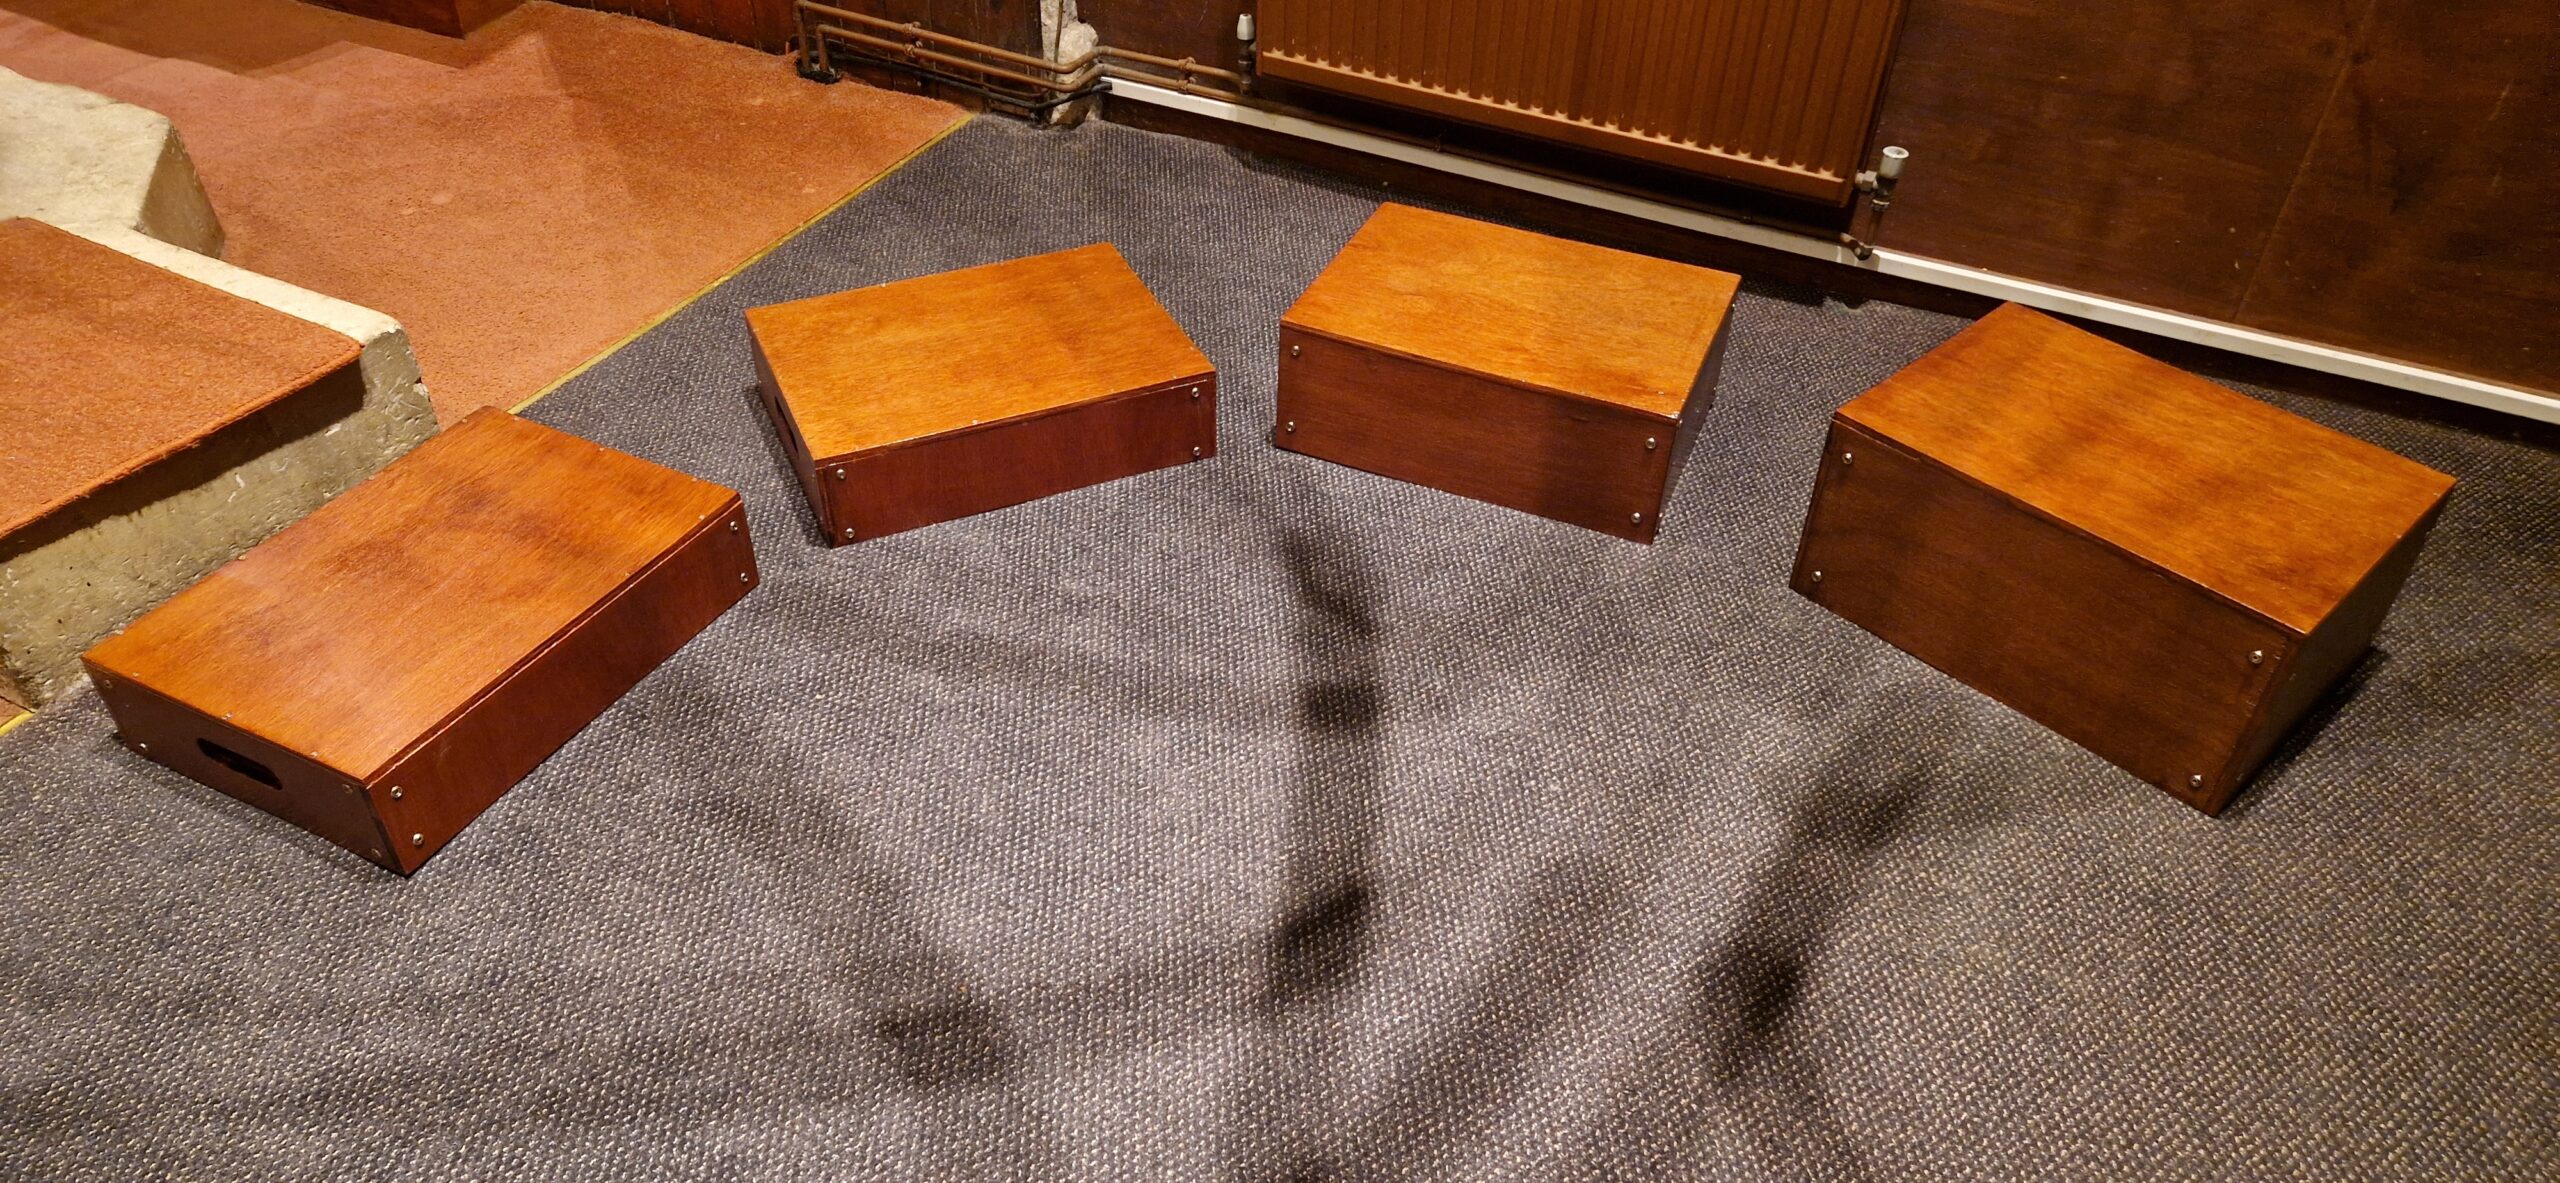
Ringer’s Boxes
Conclusion

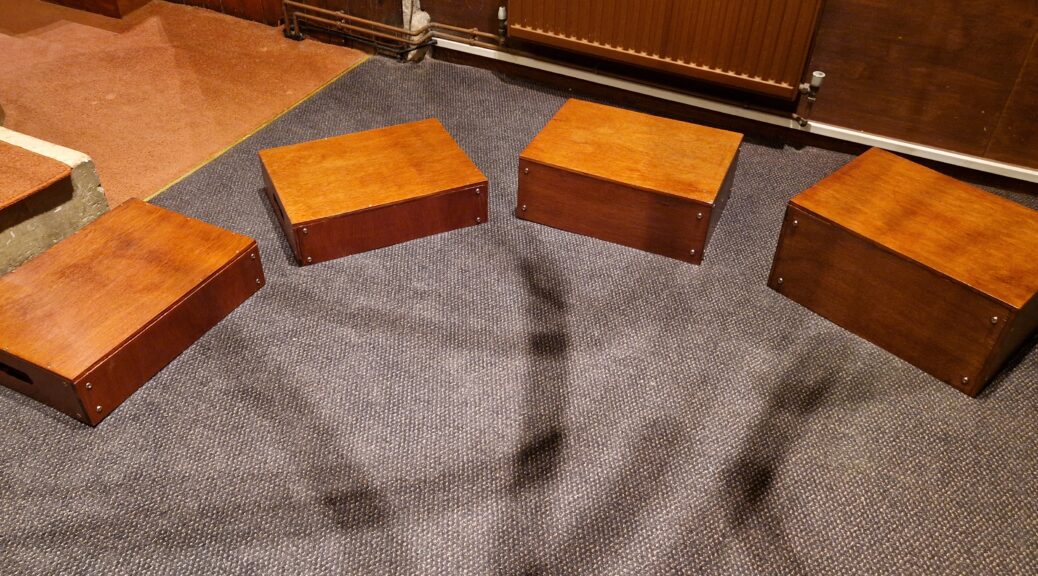
The photo shows four of the finished boxes in use.  I like the light reddish colour: they have already proved to be a useful and popular improvement, even though my carpentry is not perfect.  The shadows are from the ropes which are hanging above. The total cost was about £150 for six boxes, although I didn’t spend that much as I had some things already in my store-room.

Connecting a Reolink E1 Outdoor PoE camera directly to a PC

As the name implies, this camera is a network device, not just a simple video camera: it doesn’t have a HDMI or other video port, so you can’t just view it on a computer or TV display.

This means that it sits at a particular IP address and sends a video stream in an internet format which has to be decoded in a computer before it can be displayed.  The video stream can be decoded either with the dedicated Reolink App or in an ordinary web browser.  My testing shows that the App is better, providing less delay and more functionality.

I want to use a laptop for hosting the App.  Normally I could just connect the camera to my LAN, login to the App via my WiFi connection and view the camera.  However, I want to use this in the church tower where I do not want to connect to the church’s WiFi network – I want to plug an Ethernet cable directly between the camera and the laptop (running Windows 10).

The first consideration is that the camera requires power. I have chosen a Power over Ethernet (PoE) camera, which takes power via the Ethernet cable, but a PC doesn’t supply power from its Ethernet connection, so I need an Ethernet Power Injector.  I bought a TP-Link PoE+ model POE160S for this, as it automatically supplies the correct current.  It has two gigabit Ethernet ports, one for data in/out, which I connected to the PC, and one for data+power which I connected to the camera. The PoE Injector also has a socket for mains in – there’s no need for a separate power adaptor.

I have already given the Camera a static IP address of 192.168.1.252
This means that I don’t need to have a DHCP controller (router) to assign a network address – I will be using its known, static address.

To avoid conflicts potentially caused by the LAN router, firstly I need to turn off the laptop’s WiFi network.  I just click on the WiFi icon in the taskbar and select ‘disconnect’.

Now I plug in the Ethernet Cable and go to the Network and Sharing Centre on the laptop. Here I see that there is a connection called ‘Ethernet’ and I click on its name to open its Status dialog, showing ‘No network access’.  I click on the Propeties button and select IPv4 and again select Properties.  This enables me to set the properties of the IPv4 connector (adapter) on the  laptop.

I click ‘Use the following IP address’ and enter 192.168.1.240
This is essentially the IP address of the laptop.

The important thing about this is that both the laptop and the camera are connected to the same node (the 1 in the third group above)
I also set the subnet mask to 255.255.255.0 and leave the default gateway blank.

I set the DNS server to 8.8.8.8 and the alternative to 8.8.4.4

These are essentially null values as there is no DNS server or internet gateway – the laptop /camera network is isolated from other devices.

I can now use the Reolink app which should detect the camera, from where I can instal it.

Reverting

The downside of this adjustment is that you have disconnected your LAN and the Internet from the laptop.  In order to restore it, you need to reconnect the WiFi. You can do this by going to the WiFi icon in the taskbar and just reconnecting WiFi.

However, I found that after reconnecting the WiFi I was able to access all the LAN resources and this included viewing my other Reolink camera which is connected to the LAN via my Network switch.

It’s taken a bit of effort to get to this point, so I hope I can help others by sharing it.

Installing a Reolink E1 Outdoor PoE IP Camera

The need for a PoE camera

My Reolink PoE camera, described in an earlier post, has been working well for nearly 4 years: now I have a requirement for another camera with remote PTZ (Pan, Tilt, Zoom) control, so I have bought another Reolink as captioned above.

The bells, the bells

I look after the tower bells at St Andrew’s Church, Cobham.  A peal of bells is a heavy mechanical installation that requires constant inspection, maintenance and repair.  The heaviest bell at St Andrew’s weighs half a ton and the lightest weighs 3 cwt (150 kg): the eight bells weigh a total of just over 2 tons (tonnes). The bells swing through 360 degrees (but don’t go right round, of course) and this puts a lot of force on the bell, its suspension, the supporting frame and on the tower.

Access to this tower is difficult.  There is a pull-out ladder about 5.5m (18 ft) high, then a trapdoor through the ceiling into a chamber 2 m (6.5 ft) high which has a vertical steel ladder through another trapdoor into the clock-chamber.  This is where in the old days the clock winder had to climb at least once a week to wind the clock, which had three heavy weights, one for the going train, one for the quarter chimes and one for the hour chime. Now the weights are wound electrically.

To reach the bells, there is another clamber up a 2 m (6.5 ft) vertical ladder to reach the bottom of the bell frame.  The eight bells are stacked on two levels, and to reach the top level (which has bells 2, 3 and 7), it is necessary to scramble up another 2 metres (6.5 ft) through the pit of bell 6.  Overall it is a 40-foot climb making it impossible to take visitors to see the bells and it’s a messy job to undertake inspections.

This an obvious case for a PTZ camera with PoE (Power over Ethernet) so that only one cable needs to be fed up the tower and it can all be controlled at ground level.  At present I haven’t worked out the optimum positioning of the camera, but hopefully it should be possible to get a good view of most of the bells.

After some research, I decided that the Reolink E1 Outdoor camera would suit me.  The bell-chamber is sheltered from rain, but otherwise essentially in a harsh outdoor environment – cold, sometimes hot, damp, windy and dusty.

Connecting the camera to a network

The first step  in testing the Reolink E1 Outdoor  was to get it connected to the existing Reolink app on my main machine (which displays the cameras on the house). So firstly, I plugged an ethernet cable between the camera and my PoE network switch.  I then started the Reolink App (although you can view in an ordinary web-browser – more later)  and clicked ‘Add Device ‘ in the Device sidebar. The Add Device dialogue opens and scans the network.  The new camera appeared and I clicked the + button.

The dialog  asks you to give the admin password and you may want to change this to one of your choice.  Here, you need to be careful because the app remembers this password and also stores it in the camera.  The App automatically uses it next time you start the app (so you don’t need to reconnect to the camera each time you start the app).

Device Already Connected Error Message

However, if you have already logged in on a different machine and used the default password, changing it on the new machine will mean a world of pain on the first machine.  This is because that machine is still using the old password to login, but the camera has stored the new password internally.  So it will refuse to connect.

Worse still, because you don’t have the right password you can’t delete the camera in order to reinstall it with the correct password, nor can you try to reconnect it with the new password because you get the message that the ‘Device is already connected’ .

Ultimately, I found that on the computer that did still connect, by going to the Camera Settings dialogue and then System>User Management, I could put in a new username and password with admin status and then I could reconnect on the other computer using these new login details. Once I did login on that computer, I could change the admin password on that machine too. This enabled me to delete one of the connections.

I  would advise against selecting ‘Illegal Login Lockout’ in the User dialogue at this setup stage, as you’re probably going to be making quite a few unsuccessful logins!

However, it will be a good idea to go to Network in the Camera Settings dialogue  and in the Network information window, choose setup.  In connection type, select ‘Static’.  This will mean that the IP address will remain fixed, rather than possibly changing at the whim of your DNS/DHCP controller, which might mean that you would need to reconnect it. The camera’s IP address should be on the same node as your WiFi and router, so if your router is at 192.168.1.254, you might choose something like 192.168.1.250.  (The octet 250 must not be in use by any other device on your network.) At this stage, make a note of the camera’s IP address as you’ll need it when connecting direct to your laptop later.

So now it is working when connected to a network switch.

The next step is connecting directly to a PC.

Getting Better at Ringing

Getting Better

I’ve frequently said that it is relatively easy to learn how to handle a bell – in other words, to ring safely at a steady speed –  as long as you have a good tutor and enough time on the rope.  However, this is very much the easy part, because when you are ringing on your own, it doesn’t matter that you haven’t got much control.  It doesn’t matter if the bell sometimes falls back too quickly, or goes over the balance, as long as you can control the rope.  You should ensure that you can ring a bell up and down safely, so that you know what to do when the bell drops.

You need to learn how the bell feels when it is balanced – whether it is pulling over the balance, or dropping back again –  and what to do in either case.  In particular, you need to be confident about holding the bell on the balance at backstroke: when first learning to handle the bell,  most tutors are quite happy that the bell doesn’t quite get to the balance at backstroke, as this means that the stay won’t get bumped.  However, when ringing with others, you may often need to hold the bell up at backstroke.  The best exercise for this is to set the bell at backstroke many times, and to do this until you feel absolutely confident about it. I’m assuming you are already absolutely confident about setting the bell at handstroke!

Whole pull and stand

A fun exercise is ‘Whole Pull and Stand’.  In this exercise, everyone rings rounds and then at the Go, everyone rings a whole pull and then they all stand, except the tenor, which continues to ring at a steady speed.  Everyone pulls off at the next handstroke, and then sets for another whole pull of the tenor.  This is a great exercise and also sounds really nice when done well.

Counting

It is essential for all ringers to listen carefully to their bell.  This is very hard to do when all your attention is taken up with managing the bell and the rope.  The best advice is to count the bells as they strike and to listen to the bell ringing in your position.  Thus, if you are ringing the 3rd, count 1 for the treble, 2 for the second, and when you count 3, that is your bell.  Count the others – 4, 5, 6 as well.  Do this always and whenever you ring.  If this is hard, then your bell is the one that sounds as you catch the sally.  Try to listen to the gap between the bell in front of you and the bell behind you.  You should be exactly half-way between them.  If not, then pull slightly earlier or later as appropriate, remembering that the delay could be different at handstroke and backstroke.

Through constant repetition, it will become second nature to count your place, and this is something that will be a essential when you start to learn method ringing.

Ring facing outwards

One way of forcing people to ring by listening is to get them to stand facing outwards from the ringing circle.  If you have a good band, they should be able to achieve perfect striking, at least in rounds. This is another fun test.

Separating the physical and mental actions

As your ringing improves, you need to find ways of separating the physical action of handling the bell from the mental process of whatever you are ringing.  This helps to ingrain the physical action into the ‘muscle memory’ or autonomous nervous system, thus freeing up the mental process for thinking about what you are ringing.

This can be as simple as asking the learner to call stand after 20 whole pulls.  The learner has to think about counting whole pulls, rather than counting the place or catching the sally at the right time.  Of course, the learner is still listening to where their bell is striking, but it is happening sub-consciously.

Ringing call-changes is another way of developing the muscle memory.  It requires a bit more thinking than calling stand after so many whole pulls, and once the principle of call-changes is grasped, the learner can be asked to call very simple changes, like swapping two bells over.

However, even the simplest method ringing needs some rope-sight.  Call changes are a good way of practising rope-sight, but anything other than the simplest calls are beyond the beginner.

Mexican Wave

One fun exercise that combines several skills is ‘Mexican Wave’.  Here, the

  • treble first swaps with the 2, and then back to lead.
  • The 2 then immediately swaps with the 3 and back to the treble.
  • The 3 then swaps with the 4 and back to the 2.
  • The 4 swaps with 5 and back.
  • The 5 swaps with 6 and back to rounds.

This requires good bell control and the ability to watch the swaps coming up to you and passing on. Great fun, and needing little brain-power!


Peals

You can feel that you are a competent ringer when you have scored your first peal.  It takes skill, concentration, endurance and stamina, to name a few competencies.

Skill

You need to be able to handle your bell properly – never missing the sally, striking the bell accurately, and ringing in rhythm with the other ringers. Not over-pulling so that you get tired and develop blisters. Never deviating from your line and ensuring that you execute the calls cleanly.  This requires a very high level of skill that can take a long time to develop, although like any sort of performance art, you will get there more quickly and easily if you start young.  But you still have to be determined enough to work at it, and to find people better than you are so that you can rise to the challenge each time.

Concentration

Avoid being distracted by strange noises from things you can’t see, or by intrusive thoughts about tasks you need to do, or by physical discomfort: getting too hot or too cold, getting tired or an itchy nose, sore eyes or numb feet.

Endurance

Three hours is a long time to be entirely focussed on one objective.  Time seems to almost stand still. Your feet feel numb, your legs start aching and your hands begin to hurt, especially if you’re getting blisters. but you must not let these distract you.  The best way of doing this is to get ‘in the zone’.  Indeed, this is what I think many ringers are trying to achieve.  Let the rhythm suffuse you.  Listen to the music, and listen out for musical changes.  Feel the rhythm .  If any of you have seen or read about Marina Abramović’s work, you will be aware that she tried to achieve this state through deliberate physical discomfort – such as holding an uncomfortable pose for hours on end.  Ringing is far more productive than that – you are performing and achieving an end product, not simply doing something to or for yourself.  It’s a group activity – you are all in it together.  It’s much more like a marathon race or bike ride.  It isn’t perhaps competitive in quite the same way, but it is still a joint enterprise where you want to be as good as everyone else, or even the best.  Peal ringers are quite exclusive for this reason – they do not want to ring with others who will spoil the end product in some way – by going wrong, or just by imperfect ringing.

This means that it is actually very difficult to achieve a large number of peals – you have to be good enough that other people actually want to ring with you, so that they actually invite you to join them.

Achieving a high peal total

You will never gain a high peal total unless you work at it.  The important thing is to be accepted by a regular peal band.  There are not very many of these although all localities probably have one somewhere.  But they tend not to advertise what they are doing.  I think partly because newbies will inevitably make mistakes, lower the standard of ringing and reduce the success rate.  That ‘s the last thing that can be tolerated by an established band.  On the other hand, you will find it very difficult to set up your own peal band because the limiting factor is having someone to conduct.

Conducting

Conducting requires stamina according to one of my friends who is a leading conductor.  You must not only be able to ring your own bell without conscious effort (this does not mean without effort – just that the effort is being output by the subconscious part of your brain).  You must also be able to ring the method without conscious effort, because all your conscious effort goes into remembering the calling.  Each call must be made at each exact point in the ringing, with a margin of error of around ± 1 second. There may be hundreds of these calls, and you have to check that the other ringers have executed the call correctly and are still on the right lines.  If they have made a mistake, you need to be able to correct them immediately, before they put other people off, and at the same time continue to ring your own bell correctly.  This is immensely difficult.

Is peal ringing enjoyable?

I’ve discussed this with my peal-ringing friends and the general feeling is that the sense of achievement when you have finished is enormous.  During the peal, you have to mentally overcome the difficulties I have mentioned above and this is not easy.

However, there is a great sense of pleasure when the ringing is going well.  I have been lucky enough to ring with some amazingly talented conductors who are not afraid to go for difficult compositions designed to bring out the best music.  This usually means having many calls in complex positions and a band that is not disconcerted by this.  It is hugely pleasurable to ring with such a band.  Of course, this doesn’t mean that it isn’t equally demanding on skills and concentration, but it does mean that all the effort is worth it.

I strongly recommend all ringers to aspire to ring a peal and not to be deterred by what can seem to be an insurmountable object: if you want to do it, you can get there.

Learning methods

This post is for ringers who have passed through the initial stages – they can manage Plain Hunt and want to learn methods.  There are a number of good books that give great advice on how to do this – I especially like Steve Coleman’s series of books, and I would strongly advise ringers to get the one relevant to their level of expertise. In particular, I like

  • The Bellringer’s Early Companion; and
  • The Method Ringer’s Companion

The Bellringer’s Early Companion has a great deal of help on how to develop your first stages of Change Ringing and there is no point in me trying to re-write this.  It really will save you hours of frustration in the belfry if you get the book and study it.  I appreciate that book-learning has rather gone out of fashion, but ringers are intelligent and will vastly and quickly improve their knowledge and skills if they make the (considerable) effort.  But we are all impatient, so hear are some of my own thoughts on learning change ringing.

Simple methods
Simple methods like Plain Bob and Grandsire can be learnt by thinking of them as Plain Hunting with additional dodges.  You can buy books showing the extra dodges in a ‘circle of work’ – e.g. for Plain Bob Minor this would be 4-3 down, 6-5 down, 5-6 up, 3-4 up, 2nds.  This is fine when you are first trying to move beyond Plain Hunt, but it doesn’t work for anything much more than these basic Plain methods.  Moreover, if you get into the wrong place, it is pretty difficult to get right again.  For example:

  • You might know where you should dodge next time, but you have got out of place, so don’t know when that will be.
  • You are in the right place, but have forgotten what your last dodge was, so can’t be sure what your next dodge is.

Passing the Treble
The best approach for plain methods is to keep an eye on where (which place) you ring over the treble on your way to the back, as this will tell you your next dodge, although the next dodge will depend on the method you’re ringing, so you will have to learn a different rule for each method.  Take Grandsire Doubles for example.  If you ring over the treble in fifth’s place, you are in the hunt, so keep following the treble down to lead.  If you ring over the treble in fourths place, you dodge 4-5 down; if you ring over the treble in 3rds place, you’re 4-5 up and if the treble takes you from lead, you’re going to make 3rds.

This system extends to Grandsire on any number of bells, although it isn’t as helpful on high numbers, but hopefully your ropesight will have improved so that you’re not needing it as much.  The same system can be used for Plain Bob, although the work is different of course.

Course Bell
The other system is to know and watch your Course Bell.  This is the bell that you follow down to lead (except for the one lead after you have made seconds/thirds in Plain Bob/Grandsire.)  Knowing your course bell is very important, especially on higher numbers of bells.  A common problem for new ringers is making the dodge correctly, but then heading off in the wrong direction.  For example, dodging 4-5 up in Grandsire Triples and then going back to lead.  If you know your course bell, you would realise your error, as you must not return to lead until you have run behind over your course bell.  Also, even if you forget the dodge entirely, you mustn’t overtake your course bell, so you can swan around for a whole pull and come down after your course bell.  Of course, there will be a terrible clatter and a risk of putting others wrong, but if they’re on the ball, they will be able to keep right too.

So, make sure you know your course bell at all times.  In simpler methods, it remains fixed for some time before a bob or single changes it.

Your ‘Duty’
Until the beginning of the 20th Century, this circle of work (or ‘duty’ as the authoritarian Victorians liked to call it) was sufficient for the methods being run by most local Sunday Service bands, but this cumbersome system limited what people could ring.

For example, the book by Sir Arthur Heywood on his new method, Duffield, written in 1888, makes it clear that he thinks it’s difficult. He includes a diagram in which the path of one bell (the tenor) uses bold type. Nowadays that would sufficient to learn the method. However, Sir Arthur goes on to describe the work of each bell in seven pages of text, with hints as to keeping right.  (He expends many pages on Royal and Maximus too.)

However, it is clear from his diagram that  the structure of the method is simple and obvious.  You double-dodge on the back, hunt down to thirds, up to sixths and run through to the front where you double dodge and lead, then reverse this.  I would go as far as to say that it is simpler than St Clement’s College Bob Major, although you do have to become adept at seeing and striking in the right place.  Sir Arthur recognises that less-experienced ringers need help at finding which bells to strike over, and that is what much of the text is about.

Blue Lines
Sir Arthur did show the path of a particular bell in bold type, but he doesn’t really acknowledge that each bell follows this same continuous path, each bell merely starting at a different place along it.

This didn’t really happen until Jasper Snowdon published his revolutionary work ‘Standard Methods’ at the end of the 19th Century.  This contained a set of ‘Diagrams’ in which the Plain Course of each method is laid out in Blue Type with a line through the path of the 2nd bell and a red line through the path of the Treble.

Despite the effort Snowdon put into these Diagrams, he still describes the ‘Duty’ of each bell in exhaustive detail,  and he elaborates on the differences between the successive methods he describes.  The diagrams are merely an adjunct to illustrate the text.

However, ringers soon realised that they could learn the blue line more easily than the exhaustive descriptions of ‘Duty’.  This is partly because there is regularity and symmetry in the blue line, and because the differences between methods become clear.

However, there are some problems if you only know the line – we all experience memory blanks when you suddenly can’t remember where you are, or another bell is crunching with you but you don’t know which of you is wrong.  I’m going to try to give some hints and tips on dealing with these, so that your ringing doesn’t ‘fire out’ in a peal or quarter peal.

Learning those Pesky Blue Lines
Becoming a good method ringer needs two things: the ability to recall the blue line instantly and the ability to see which place you are ringing in.

Let’s deal with the first of these: memorising those pesky blue lines.  You need to find a way of thinking about the lines.  I’ve heard people chanting them out as a series of numbers such as

1 2 1 1 2 2 1 2 1 1 2 1 2 3 4 3 4 5 6 7 8 7 8 7 8 8 7 8 7 6 5 6

Some people may recognise this as the seconds place bell work in Cambridge Major.  Everyone will recognise that it would be desperately easy to lose you way, due to the repetition.

Most ringers would divide this into blocks – the first part is Cambridge Front Work.  Then ‘dodge 3-4, two and one (dodges) on the back, dodge 5-6 down at the lead end’. (This is more-or-less how the work is described in Snowdon’s text.)  You must learn to translate this verbal image into a visual (or aural) pattern in order to be able to ring it.

With this ability, 6th’s place bell becomes ‘lead and dodge up to 5-6 places, dodge behind and become 7ths place bell’.

Likewise, the work of each bell can be distilled into a few words.  We can describe methods far more difficult than ‘Duffield’ quite simply, although you still have to memorise them.

I will expand on this in due course, but why not consult one of the books I’ve mentioned?